The best cat wall bridge ideas for most homes are a rope or suspension bridge for playful cats, a floating shelf run for a cleaner look, and a hammock bridge for cats who like to nap mid-climb. Before you buy or build any of them, find your wall studs and plan your mount points around them. Once you know your stud layout, the rest of the decision (materials, spacing, style) gets a lot easier.
TL;DR:
- Using stud multiples for mounting ensures a cat wall bridge can support dynamic loads and prevent br lifting or flexing under jumping forces.
- Combining textured surfaces like sisal, cork, or wood on one route enhances a cat’s engagement and encourages regular use.
- For multi-cat households, increasing bridge width or adding parallel routes reduces conflicts and improves safety during crossing.
- DIY builders should measure gaps carefully, especially for senior or kitten cats, and include center supports for spans longer than a few feet.
- Modular and non-permanent mounting options, such as French cleats or freestanding towers, provide flexible solutions for renters and temporary setups.
Table of Contents
- Cat Wall Bridge Ideas: Types, Best Uses, and Quick Pros and Cons
- Materials and Texture Choices for Traction and Comfort
- Safety Essentials: Studs, Load Planning, and Spacing by Age
- Installation Basics and a Quick How-To Checklist
- Renter-Friendly Mounting and Alternatives
- DIY Project: A Simple Rope and Shelf Hybrid Bridge
- How The Meow Picks’ Products Map to These Bridge Ideas
- Design Perspective: Balance Routes, Texture, and Maintenance
- Ready to Build or Buy Your Cat’s Wall Bridge?
- Sources
- FAQ
Cat Wall Bridge Ideas: Types, Best Uses, and Quick Pros and Cons
Every wall bridge for cats falls into one of five basic formats, and each one serves a different kind of cat and a different kind of room.
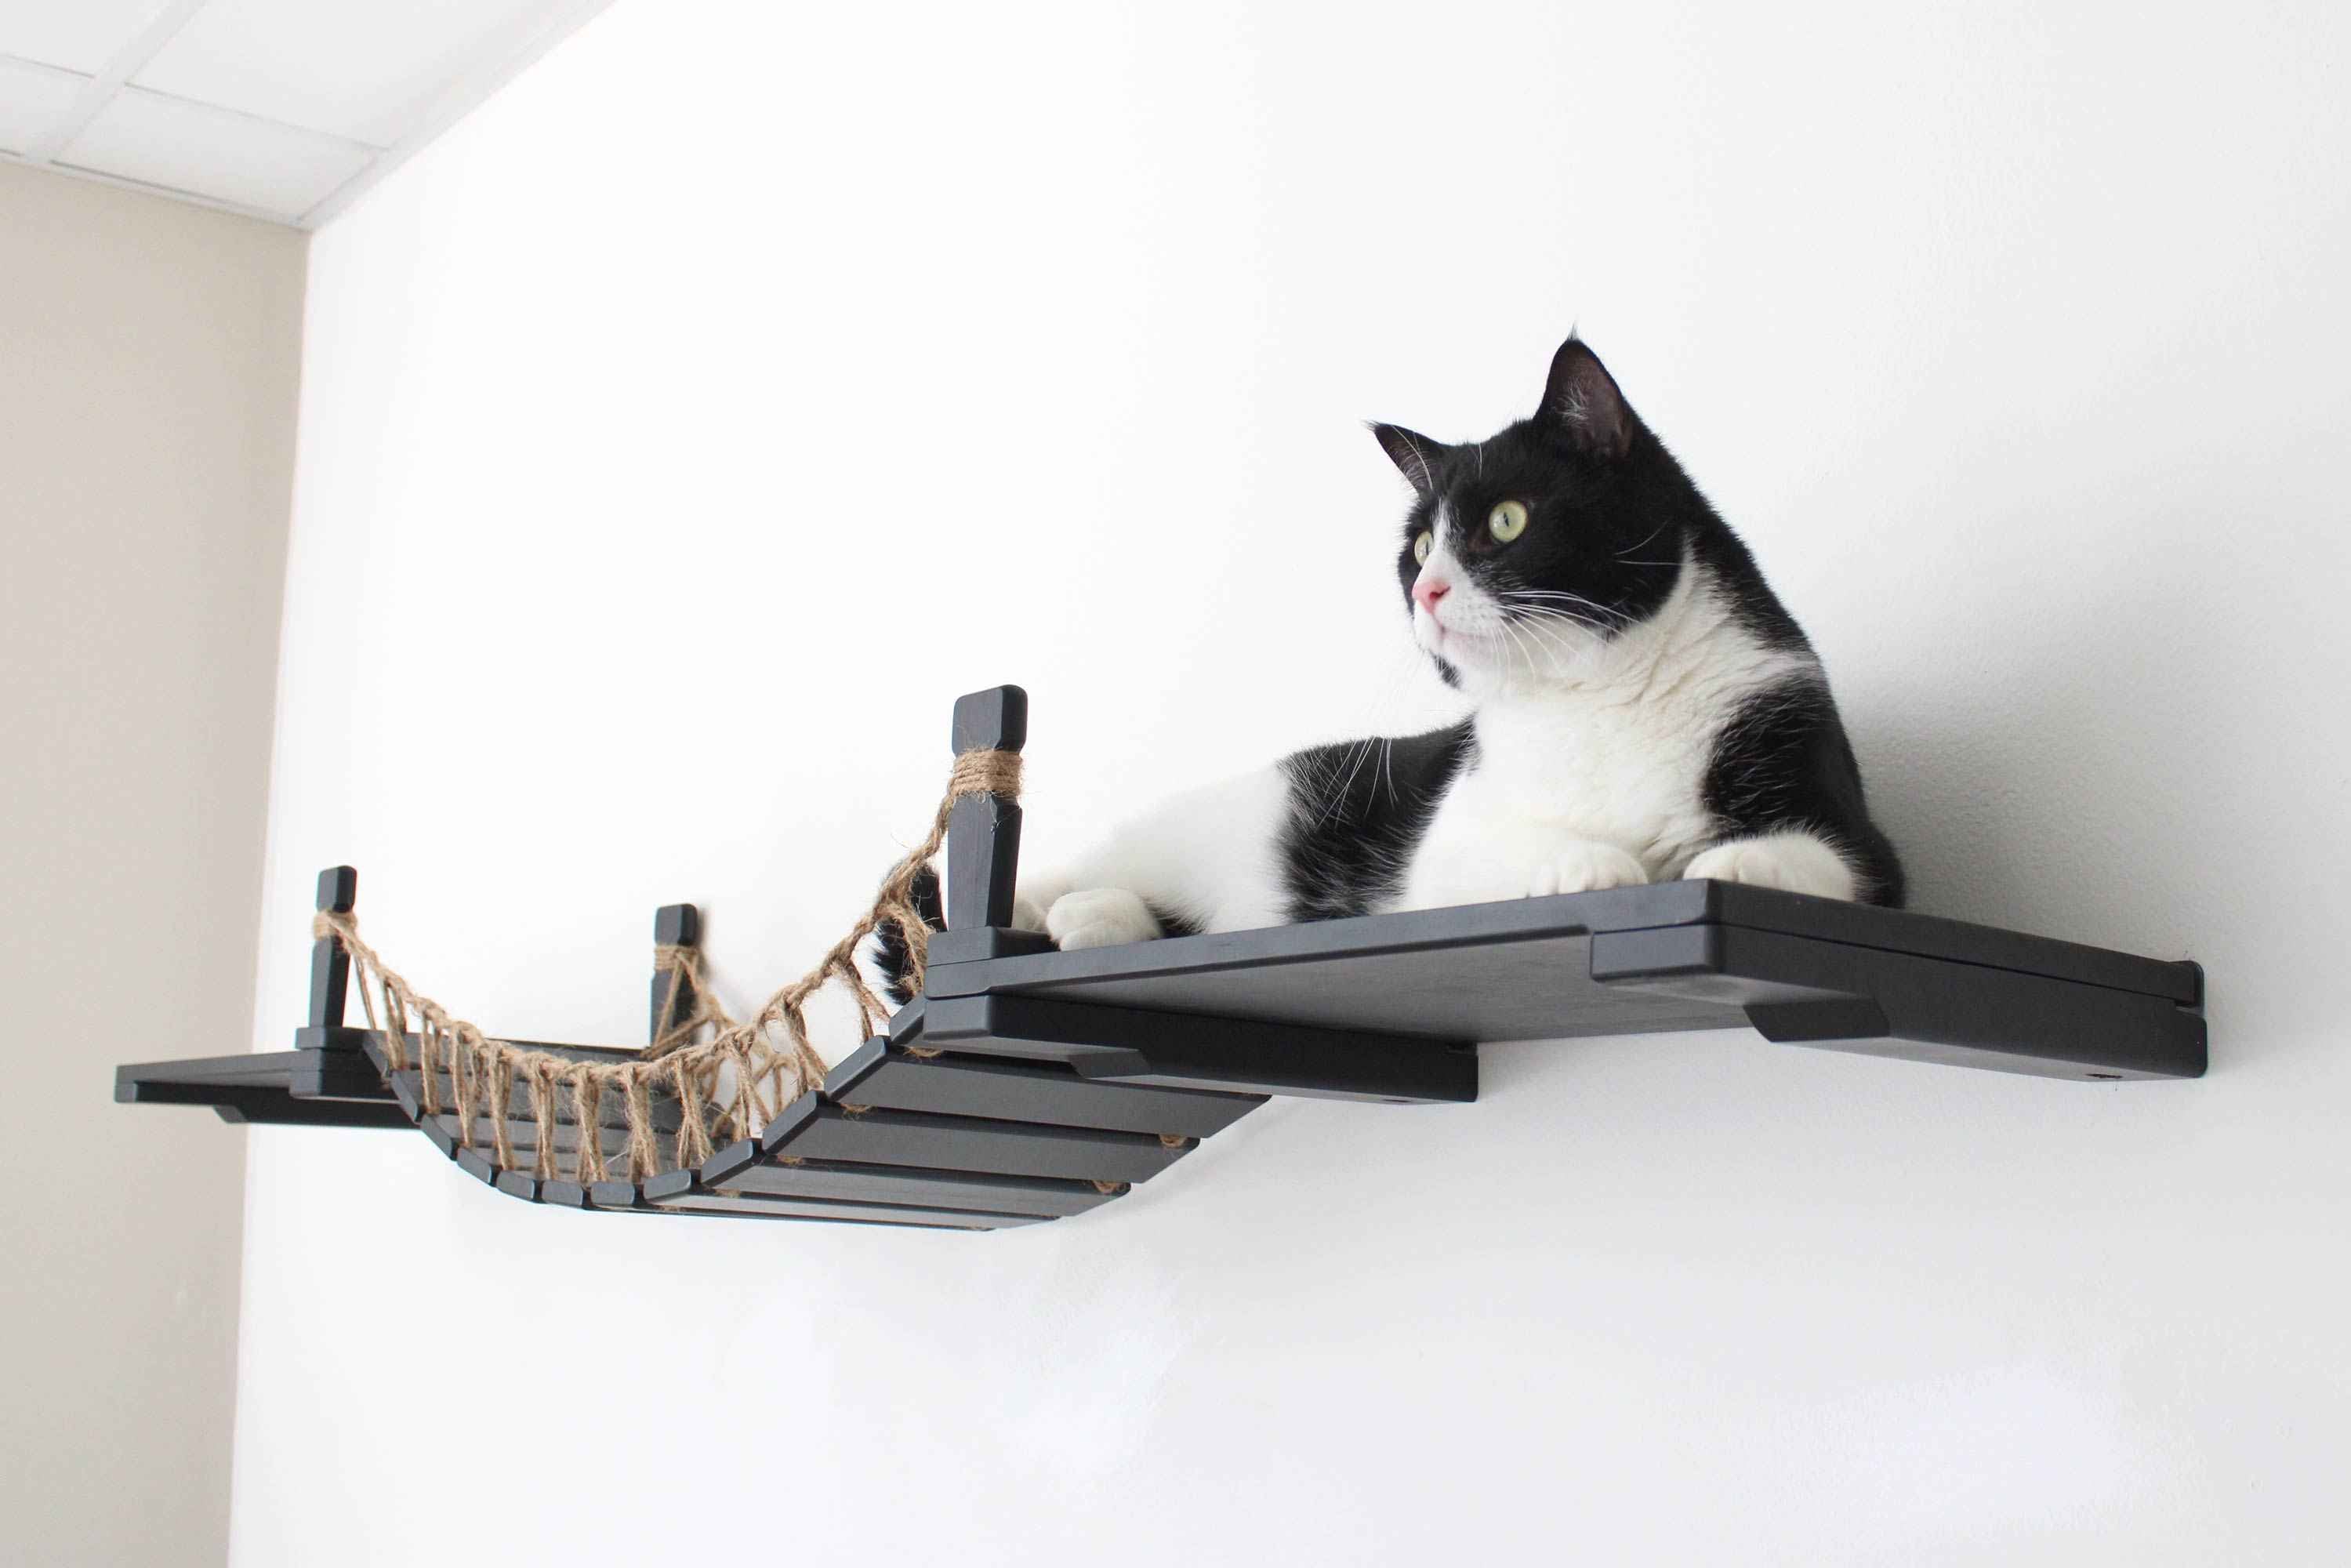
- Rope or suspension bridge. Two anchor points hold a length of paracord or knotted rope between them. Good for playful, younger cats who like a little wobble. Installation is simple, but the bounce can spook a nervous cat or a senior with joint pain.
- Floating shelf run. A series of solid wood or engineered shelves mounted straight into studs, spaced for walking rather than jumping. This is the cleanest look for a minimalist room and it’s the easiest to keep dust-free, but it takes more measuring and more anchor points than a rope bridge.
- Hammock or enclosed bridge. A fabric sling or boxed platform, often mid-route, built for lounging rather than travel. Cats that like to survey a room from a perch tend to gravitate here first.
- Ladder or step bridge. Staggered steps or rungs that climb at an angle instead of running level. Useful in narrow hallways where a straight shelf run won’t fit, though the incline makes it a poorer choice for older cats.
- Modular shelf series. Multiple small shelves and connectors sold as a set, letting you build a custom route over time. This format handles multi-cat households best because it gives more entry and exit points along the same wall.
Rope bridges and shelf runs combine well in modular systems: use the shelf run as the stable backbone and add a short rope section as a single playful detour, not the main path.
Materials and Texture Choices for Traction and Comfort
Traction determines whether your cat trusts a bridge enough to use it daily, and that comes down to surface material more than shape or color.
- Sisal rope or sisal-wrapped platforms give the best grip for jumping and landing, and cats that already scratch sisal posts adapt to it fastest.
- Carpet remnants are soft on paws and good for resting spots, but they trap hair and are harder to spot-clean than rope or wood.
- Cork panels offer a quieter, grippier surface than bare wood and resist scratching better than carpet.
- Bare wood looks the cleanest and matches modern shelving, but it’s the most slippery option unless you add a light texture.
If you seal any wood surface, use a water-based polyurethane rated safe for pet contact rather than an oil-based finish, since it off-gases faster and dries harder against repeated scratching. Add a removable rug pad or fleece square at rest points like hammocks or wide shelf landings. Removable pads let you wash them separately instead of scrubbing a mounted surface in place.
Pro Tip: Mix at least two textures on one bridge run, sisal for jump landings and cork or wood for the walking sections. Cats engage longer with a route that changes underfoot instead of one flat surface the whole way.
Safety Essentials: Studs, Load Planning, and Spacing by Age
A cat wall bridge is only as strong as what it’s screwed into, and that starts with finding your studs, not guessing at them.
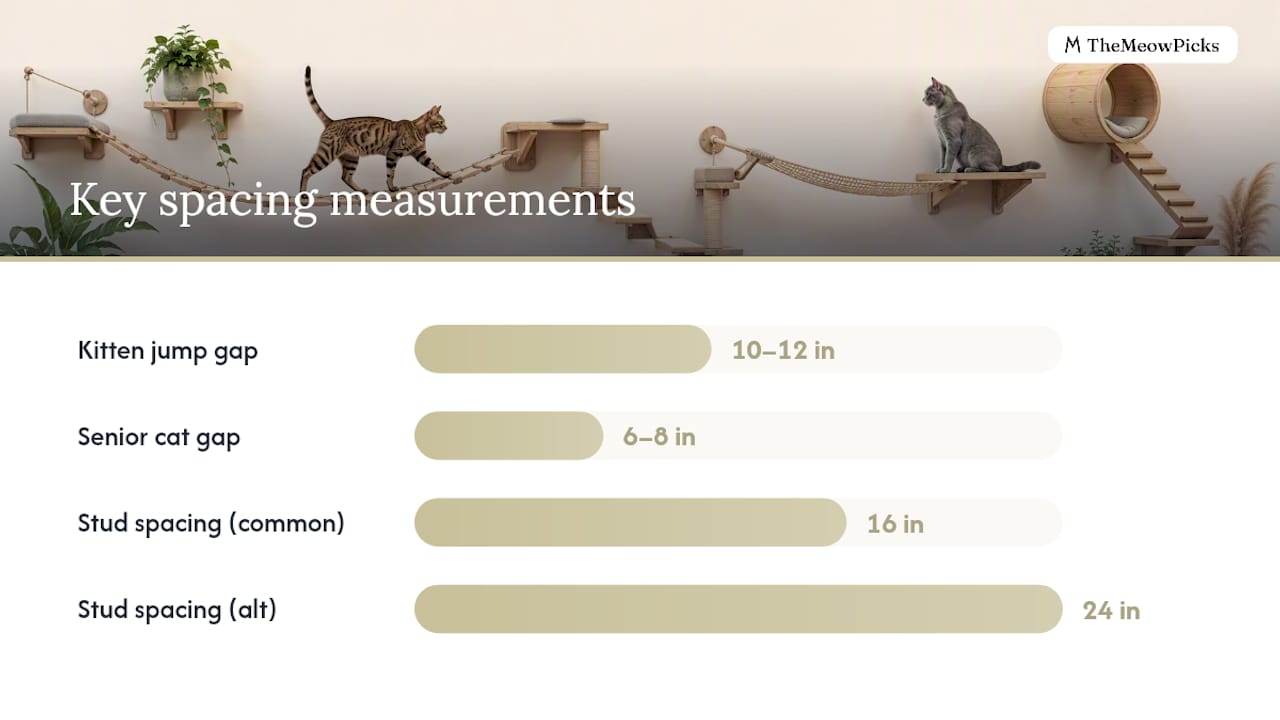
- Locate your studs before you plan anything. In most US homes, studs sit at 16 or 24 inch centers, so a stud finder and a pencil should be your first purchase, not your last.
- Anchor into the stud itself, not just drywall. Drywall anchors alone can pull through under repeated jumping, even when they hold fine for a static picture frame.
- Plan bridge length in stud multiples. A run that lands its brackets on two or three studs spreads the load far better than one relying on a single anchor point.
- Size gaps to the cat using the bridge. Kittens can comfortably manage jumps of 10 to 12 inches between platforms, while senior cats do better with gaps of 6 to 8 inches, or a ramp instead of a jump.
- Add a center support on any span longer than a few feet. Long unsupported runs flex more under a landing cat than they do just sitting there.
Quick fact: jumping and landing put far more force on a bridge than a cat’s resting weight alone. Design with a safety margin that assumes dynamic load, not just static weight, and when in doubt on a long span, bring in someone with framing experience rather than guessing at bracket count.
In multi-cat homes, add extra width or a second parallel route so cats aren’t forced to pass each other on a narrow plank. That single change prevents most of the standoffs that happen on a one-cat-wide bridge.
Installation Basics and a Quick How-To Checklist
Getting a bridge level and structurally sound is mostly about sequence, not skill.
Tools and materials: stud finder, drill with pilot and driver bits, level, tape measure, pencil, wood screws or lag bolts, brackets rated for shelving, and your chosen rope, sisal, or shelf boards.
- Find and mark every stud along your planned route with a stud finder and pencil.
- Measure and mark bracket positions so each one lands on a stud center, not between them.
- Drill pilot holes slightly smaller than your screws to prevent splitting the wood or stripping the hole.
- Mount brackets first, checking each one with a level before moving to the next.
- Attach shelves, ropes, or platforms to the mounted brackets, keeping spacing consistent with your planned gaps.
- Let any adhesive or wood finish cure fully. Rushing this step is a common reason finishes peel under scratching.
- Test each section yourself with firm hand pressure before letting your cat near it.
Give the whole structure a few days of light testing before treating it as finished. A bridge that holds under your hand today should still feel solid a week later once it’s had repeated real use.
Renter-Friendly Mounting and Alternatives
Not every home allows permanent screw holes, and you don’t need them to build a workable bridge system.
- French cleat systems distribute weight across a mounted rail and let you lift the whole shelf off later, patching one strip of holes instead of dozens.
- High-capacity removable anchors work for lightweight decorative shelves, but they’re a poor match for anything a cat will jump onto repeatedly.
- Bridging between existing furniture, like a tall bookshelf and a window perch, skips wall mounting entirely.
- Freestanding posts and towers placed near a wall can substitute for a mounted route while still giving vertical climbing options.
Pro Tip: If your lease allows French cleats, mount the cleat rail into studs exactly as you would a permanent bracket. The cleat is removable; the anchoring underneath it still needs to be solid.
DIY Project: A Simple Rope and Shelf Hybrid Bridge
This project pairs a stable shelf landing on each end with a rope section in the middle, giving you an easy build with a bit of play built in. Skill level: beginner to intermediate. Time: a weekend afternoon, plus overnight cure time for any finish.
Materials:
- Two 12 by 8 inch wood shelf boards
- Four shelf brackets rated for wall mounting
- 6 feet of ⅜ inch sisal or paracord
- Wood screws (sized to your brackets) and wall anchors rated for stud mounting
- Stud finder, drill, level, sandpaper, and optional water-based polyurethane
Steps:
- Mark stud locations for both shelf ends, keeping the run between 3 and 5 feet apart for a manageable rope span.
- Mount both brackets and shelves, checking level on each before proceeding.
- Drill two holes on the inner edge of each shelf to thread the rope through.
- Thread the rope through both shelves and knot it tightly on the underside of each.
- Sand any exposed wood edges and apply finish if desired, then let it cure fully.
- Test the rope tension and shelf stability by hand before allowing your cat near it.
Common pitfalls: too much bounce means your rope span is too long for its diameter, so shorten it or add a center anchor point. Anchors pulling loose almost always mean the bracket missed the stud. Catster’s DIY cat bridge roundup and the Instructables cat adventure wall build both walk through similar hybrid layouts if you want a second reference before cutting wood.
How The Meow Picks’ Products Map to These Bridge Ideas
If building from scratch isn’t for you, the guide above still applies when you’re buying instead. The Cat Bridge for Wall works well as a single connector between two existing perches, and it’s sized with stud spacing in mind, so measure your studs the same way you would for a DIY build.
- Single bridge run, minimal footprint: the standalone wall bridge.
- Full climbing route across a wall: the Cat Wall Bridge and Shelf Set, which pairs shelves with a connecting bridge for a ready modular layout.
- Need an extra connector piece later: a corner shelf bridge extends an existing run without a full rebuild.
The products offered come from independent makers, and a portion of each order supports cat rescue. Measure your wall and stud spacing before ordering so the piece you pick lines up with your actual mount points.
Design Perspective: Balance Routes, Texture, and Maintenance
The bridges that get used every day, not just admired for a week, mix travel routes with resting platforms instead of choosing one or the other. Vary texture along the route so grip changes with the task: rope for landings, wood or cork for walking. Modular setups pay off years later, since you can widen gaps for a kitten who’s grown or shorten them for a cat slowing down with age. One thing we see overlooked constantly: bridges installed a few inches from curtains or a shelf of breakables. Cats miscalculate landings more often than owners expect, so give every route a clear runway.
— TheMeowPicks Team
Ready to Build or Buy Your Cat’s Wall Bridge?
This site offers an alternative to guesswork DIY forums and generic big box shelving. Every piece in the catalog comes from independent makers who design specifically for feline weight, grip, and jump behavior, not repurposed human shelving.
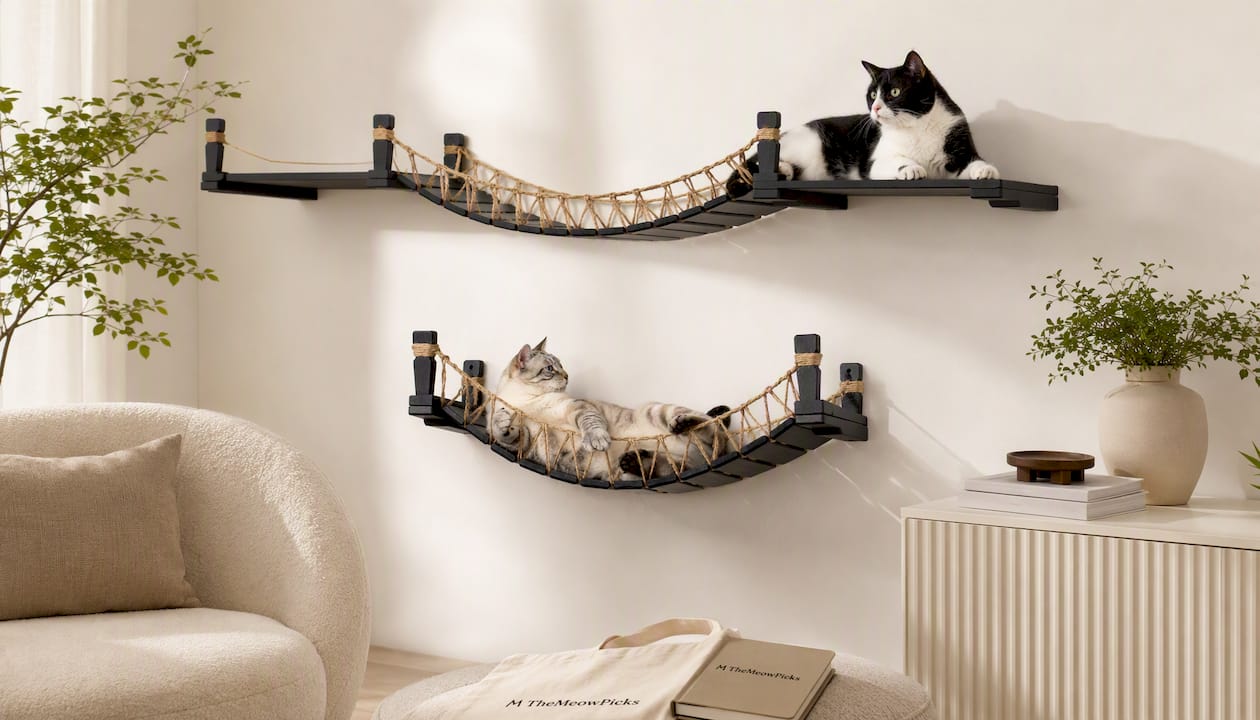
If your wall studs line up with a standard run, the Cat Bridge for Wall gives you a single connecting piece sized for exactly the kind of mounting this guide walks through. For a full route across a room, the Cat Wall Bridge and Shelf Set combines shelves and a bridge in one purchase, so you skip the trial and error of matching separate pieces. And every order, whether it’s a single bridge or a full furniture and lifestyle setup, sends a portion of the sale to cat rescue organizations. Measure your studs, pick the size that matches your span, and add your choice to cart when you’re ready.
Sources
- How to determine the distance between wall studs
- Cat Adventure and Escape Wall : 12 Steps (with Pictures)
FAQ
Can I Make a DIY Cat Bridge Walkway?
Yes, a basic walkway needs only a stud finder, brackets, boards or rope, and a level. Catster’s roundup of DIY cat bridge projects covers several buildable formats, including rope bridges and shelf runs, with materials lists you can adapt.
Do Cats Actually Like Cat Bridges?
Most cats respond well to elevated routes because climbing and surveying a room from height matches natural behavior. Cats that already use window perches or tall cat trees tend to adopt a wall bridge fastest, especially when it connects two spots they already visit.
What Are Some Good DIY Cat Wall Ideas Beyond a Bridge?
Floating shelf runs, corner platforms, and ladder steps all pair well with a bridge to form a full route rather than one isolated piece. Our guide to cat climbing wall ideas covers additional layouts if you want to expand beyond a single bridge.
Is It Cheaper to Build or Buy a Cat Bridge?
Building is often cheaper on materials alone if you already own basic tools, but a ready-made option like the Cat Bridge for Wall saves the time cost of measuring, cutting, and finishing. Current pricing for The Meow Picks’ bridge and shelf products is listed on each product page.